Overgrown Garden Clearance in Woolwich: Step-by-Step Guide for Fast, Safe Results
An overgrown garden is more than just an eyesore – it can become a serious practical problem affecting safety, drainage, pest activity, and even property value. In Woolwich, where gardens often grow rapidly due to mild and damp conditions, neglect can turn a manageable space into dense vegetation within a single season.
This guide provides a professional-level clearance method, showing exactly how to restore control step-by-step, plus when it makes sense to handle it yourself or bring in specialists.
What Causes a Garden to Become Overgrown?
Understanding why gardens become overgrown helps prevent it happening again. Common causes include:
- Seasonal rapid growth during spring and summer
- Lack of regular maintenance cycles
- Fast-spreading weeds such as brambles and nettles
- Vacant or rented properties without upkeep
- Poor drainage encouraging weed proliferation
- Previously landscaped gardens reverting to natural growth
In Woolwich, the combination of rainfall and fertile soil accelerates regrowth significantly compared to drier regions.
Risks of Leaving an Overgrown Garden Untouched
An overgrown garden is not just a visual issue, it can escalate into multiple structural and environmental problems. Common risks such as:
- Rodent nesting and increased pest activity
- Damage to fencing, sheds, patios, and pathways
- Hidden trip hazards under dense vegetation
- Blocked sunlight killing off intended plants or lawns
- Fire risk in dry summer conditions (dense dry brambles)
- Reduced property value and kerb appeal
The longer it is left, the more expensive and time-consuming clearance becomes.
Step-by-Step Overgrown Garden Clearance Method (Professional Approach)
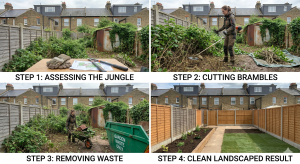
Step 1: Full Site Assessment and Safety Check
Before any cutting begins, inspect the entire garden carefully.
You should identify:
- Areas of dense vegetation versus open ground
- Hidden structures (fences, sheds, ornaments)
- Possible hazards (broken glass, metal, uneven ground)
- Nesting birds or wildlife activity
- Access routes for waste removal
This step prevents injury and avoids damaging buried structures.
Step 2: Divide the Garden into Manageable Zones
Large overgrown gardens become overwhelming if tackled all at once.
Break the space into:
- Front section (access and visibility first)
- Central growth zones
- Boundary lines and fence edges
- Rear or hidden sections last
Working in zones creates measurable progress and reduces fatigue.
Step 3: Clear Access Paths First
Before tackling thick vegetation, carve out walkable routes.
This allows:
- Safe movement through the garden
- Better visibility of hazards
- Easier waste transport
- A psychological sense of progress
Use a strimmer or brush cutter to open temporary pathways.
Step 4: Remove Large Vegetation and Structural Growth
Now begin tackling the heavy growth.
Focus on:
- Overgrown hedges and shrubs
- Small trees or self-seeded saplings
- Thick bramble clusters
- Ivy covering walls or fences
Cut in layers rather than removing everything in one go. This reduces strain on tools and gives better control.
Step 5: Cut Back Ground-Level Growth
Once large vegetation is removed, reduce everything close to ground level.
Typical targets:
- Long grass and weeds
- Nettles and dock plants
- Dense ground cover plants
- Hidden debris under vegetation
At this stage, the original garden layout should start becoming visible again.
Step 6: Root Removal and Regrowth Prevention
This is the step many DIY attempts miss.
To prevent rapid regrowth:
- Dig out bramble roots and runners
- Remove ivy root systems where possible
- Extract deep-rooted weeds such as docks and dandelions
- Treat stubborn regrowth areas if needed
Without this step, gardens can revert within weeks.
Step 7: Waste Sorting and Clearance Strategy
Overgrown gardens produce large volumes of waste.
Organise materials into:
- Green waste (grass, leaves, soft vegetation)
- Woody waste (branches, shrubs, trunks)
- Mixed debris (soil, rubble, general waste)
Disposal options:
- Council green waste collections (limited volume)
- Skip hire for large jobs
- Man and van garden clearance services
- DIY transport to recycling centres
Step 8: Final Ground Restoration
Once cleared, the space should be stabilised immediately.
Recommended actions:
- Level uneven ground
- Re-seed bare soil areas or lay turf
- Add mulch to suppress weeds
- Install weed membrane for long-term control
- Reinforce damaged fences or borders
This step prevents the garden from regressing quickly.
DIY vs Professional Garden Clearance in Woolwich
DIY Garden Clearance (Best for Controlled Overgrowth)
Suitable when:
- Vegetation is dense but not fully unmanageable
- You have access to basic garden tools
- Time is not a major constraint
Advantages:
- Lower cost
- Full control over pace and method
- Flexibility in scheduling
Challenges:
- Physically demanding work
- Waste disposal can be difficult
- Higher risk of injury in dense growth
- Time-consuming for large gardens
Professional Garden Clearance (Best for Severe Cases)
Ideal when:
- Garden is heavily overgrown or inaccessible
- Time is limited (e.g. property sale or tenancy change)
- Large volume of waste is expected
Advantages:
- Fast completion (often within a day or two)
- Industrial-grade equipment for dense vegetation
- Waste removal included
- Safer handling of hazardous conditions
Challenges:
- Higher upfront cost
- Requires booking availability
Cost Guide for Overgrown Garden Clearance in Woolwich
Prices vary depending on density, size, and accessibility.
Typical ranges:
- Small overgrown garden: £120 – £350
- Medium overgrown garden: £350 – £800
- Large or heavily dense sites: £800 – £2,500+
Cost factors include:
- Thickness of vegetation (brambles, ivy, saplings)
- Volume of waste removal required
- Ease of access (narrow alleys or rear gardens)
- Time required for full clearance
In many cases, professional clearance becomes more cost-effective when factoring in tool hire and waste disposal fees.
Essential Tools for DIY Clearance
If tackling the job yourself, these tools are typically required:
- Heavy-duty gardening gloves and protective clothing
- Petrol or electric brush cutter for dense areas
- Hedge trimmer for boundary control
- Loppers for thick branches
- Spade and fork for root extraction
- Rake for clearing debris
- Protective goggles and boots
Using underpowered tools is one of the main reasons DIY clearance fails or becomes prolonged.
Safety Considerations (Often Overlooked)
Overgrown gardens can hide unexpected hazards.
Always watch for:
- Sharp metal or broken glass hidden in vegetation
- Uneven ground and hidden holes
- Insect nests or wasp activity
- Slippery mud or decomposing organic matter
- Strain injuries from repetitive cutting
Work slowly and systematically rather than rushing large sections.
Common Mistakes to Avoid
- Cutting everything down without a clearance plan
- Ignoring root systems and regrowth sources
- Underestimating waste volume
- Using incorrect tools for thick vegetation
- Leaving cleared soil exposed (leads to fast regrowth)
- Working without protective gear
How to Prevent Future Overgrowth
Once cleared, maintaining control is significantly easier.
Recommended routine:
- Monthly light trimming during growing season
- Seasonal hedge maintenance (spring and late summer)
- Early weed removal before root establishment
- Annual deep tidy-up in late winter
- Keeping borders defined and accessible
Consistency is the key factor in preventing repeat overgrowth.
Best Strategy for Woolwich Homeowners
For most Woolwich gardens, the most effective approach is:
- DIY clearance for light to moderate overgrowth
- Professional clearance for dense, inaccessible, or long-neglected gardens
- Follow-up maintenance every 4–8 weeks during growing season
A structured clearance approach restores usability quickly, while proper aftercare prevents future regrowth and keeps the garden manageable year-round.